Tuesday, May 22, 2018

Evelyn Lovely 5 Layout

Lately, I've been scrapbooking individual shots of Parker and Evelyn from our 2016 Family Pictures. I first finished one of Parker (Hey Buddy, Look Here Layout), then I moved on to this picture of Evelyn.

Fortunately for me, Evelyn likes having her photo taken and does her best to work the camera, as evidenced by her posing. We usually don't tell her how to pose, she just does it.

I picked up the patterned paper for the background at the Scrapbook Expo last fall. (It's in Mesa this year 9/14-9/15). I also used embellishments from the SCT Sampler, as well as what I had in my stash.

Evelyn Lovely 5 Layout | shirley shirley bo birley Blog

And as before, I continue to chip away at scrapbooking family photos!

Friday, May 4, 2018

2018 100 Day Project: Day 1 to Day 9

I decided, a little at the last minute, to do something for the 100 Day Project this year. I've never done it before and it seemed like a fun challenge.

Knowing myself, however, and knowing how crafting tends to fit into my schedule, I opted to do artist trading cards (ATCs) in 9-day sprints, which takes some of the pressure off of doing an ATC literally every day (done is better than perfect!). Much to nobody's surprise though, I am a little behind, but I hope to catch up in the next couple of weeks!

For the first 9-day sprint, I knew that I wanted a kraft card base and a specific palette - navy, dark purple, light blue, light purple, light pink, and white. I went with acrylic painting as the medium. My favorites are the ones where I used the tip of a flat brush to paint narrow lines.

2018 100 Day Project: Day 1 to Day 9 | shirley shirley bo birley Blog

I'm thinking I'll eventually turn all the ATCs from my 100 Day Project into pocket letters to send as snail mail.

On the docket for the rest of the project:
Day 10 to 18: white dry embossed card base with embellishments
Day 19 to 27: red
Day 28 to 36: orange
Day 37 to 45: yellow
Day 46 to 54: green
Day 55 to 63: blue
Day 64 to 72: purple
Day 73 to 81: flora
Day 82 to 90: fauna
Day 91 to 99: watercolor
Day 100: whatever tickles my fancy for that last day!

Monday, April 23, 2018

Love You, My Dears Layout

I decided to play along this month in the Pinkfresh Studio April 2018 Challenge!

I am, of course, continuing to scrapbook photos from our 2016 family session (2016 Family Pictures), because there's so much to scrapbook and so little time . . .

I had this picture of Evelyn and Parker hugging during the photo shoot as my work computer background for a while, so it's a favorite, and I'm glad I got it scrapbooked.

I wanted to use the cork deer shape that I've had for a while (probably a decade), and to go with the deer shape, I chose to do a title with "dear" - it worked well that they're homophones!

Love You, My Dears Layout | shirley shirley bo birley Blog
Love You, My Dears Layout | shirley shirley bo birley Blog< 20180422_105037_Love-You-My-Dears-Layout-02
20180422_105051_Love-You-My-Dears-Layout
20180422_105056_Love-You-My-Dears-Layout

SUPPLIES:

Paper: Pinkfresh Studio (patterned paper); Bazzill Basics Paper (light blue solid cardstock); Doodlebug Designs (gold dotted vellum); Crate Paper (Maggie Holmes gold doily vellum)
Embellishments: Pinkfresh Studio (wood veneer heart); Elle's Studio (wood veneer hearts); American Crafts (Thickers); Target (large pink doily); local scrapbook store (white doily, cork shapes)
Tools: Stampin' Up (scallop circle die); Martha Stewart (scallop die)
Other: Sharpie pen

Friday, April 13, 2018

Heat Transfer Vinyl Shirts Using Silhouette and PowerPress Heat Press

Around this time last year, I made a couple of shirts using my Silhouette Cameo and heat transfer vinyl - an "I am this many" shirt and a Bear Down Arizona shirt.

I was using my iron to apply the heat transfer vinyl (Siser EasyWeed) and noticed that it resulted in some uneven application of the vinyl. I made an offhand remark to Greg about how I could see the benefits of having a heat press and behold! We now have a PowerPress heat press! (Thanks, Greg!)

I wasn't trying to hint to Greg that I wanted a heat press - that's not how I roll. But at the same time, I'm not complaining that we have one, especially since I was able to make these team shirts for Greg's coworkers for the local Rugged Maniac race.

Heat Transfer Vinyl Shirts Using Silhouette and Heat Press | shirley shirley bo birley Blog

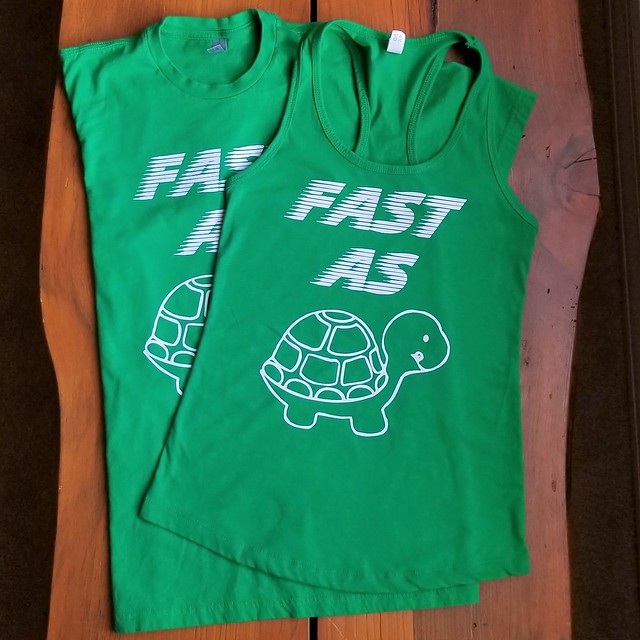
The heat pressing part was very straight forward. What took the longest was the cutting and weeding of the vinyl. I also had to re-cut a few pieces of vinyl since some of the cut lines were missed in the cutting (so then I couldn't weed completely) or when I was weeding, some small pieces came off that weren't supposed to.

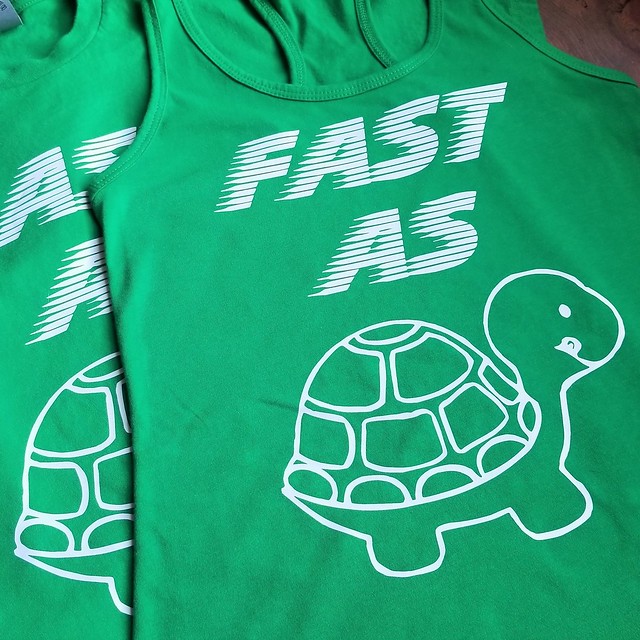
The design came from one of Greg's coworkers, and I was pleased with how well the Silhouette software handled converting the picture file to a cut file. (See: How to cut a JPEG with Silhouette Studio - the functionality is still there in the Silhouette software, though the exact path to get there may have changed)

Before I embarked on making the shirts, I also did some research on Pinterest and the Silhouette School blog. Based on this Cheaper Alternative to Pressing Pillows: Pressing Pads! post from the Silhouette School blog, I got these Tee Pad It pressing pads from Heat Press Nation. These worked well to prevent seams from getting in the way of evenly applying the heat transfer vinyl, which I had happen on one of my first heat transfer vinyl shirts that I did with my iron.

I have a couple of other projects I'd like to do with heat transfer vinyl, the Silhouette, and the heat press, I just need to find the time to do them along with all the other craft projects!

Friday, April 6, 2018

Pretty Postal Tropical Swap 2018 - Sent

I participated in Pretty Postal's tropical mail swap in February. I thought the swap theme was fun - here are the tropical-themed items I included in what I sent to my swap partners.

To see what I received from my swap partners: Pretty Postal Tropical Swap 2018 - Received

Fuse Tool Pineapple Shaker

Using the We R Memory Keepers Fuse tool, along with pineapple clip art I found online (as a guide) and colorful sequins, I made these pineapple shakers:

Pretty Postal Tropical Swap 2018 - Sent | shirley shirley bo birley Blog - Pineapple Shaker with We R Memory Keepers Fuse Tool

Tropical Mini Card

This mini card is made from tropical-themed patterned paper, plus a few sequins and a stamped sentiment. The card is only about 2 inches square, and the card base is from a basic card and envelope pack I bought a while ago from either JoAnn or Michael's. The nice thing about buying a basic card set is that it comes with envelopes already, and all I needed to do was to decorate the front of the cards.

Pretty Postal Tropical Swap 2018 - Sent | shirley shirley bo birley Blog

Pineapple Washi Tape

The clear tag is made from transparencies that I trimmed down and set an eyelet in using a Crop-a-Dile. I'd previously gotten some pineapple washi in different colors from Freckled Fawn, and was glad that I had a perfect reason to share the washi.

Pretty Postal Tropical Swap 2018 - Sent | shirley shirley bo birley Blog

Monstera Card

These clean and simple monstera leaf cards were made using the Silhouette Cameo, along with a design from the Silhouette design store.

Pretty Postal Tropical Swap 2018 - Sent | shirley shirley bo birley Blog

Clear Envelopes

I intended to use these clear envelopes, but the post office worker told me that they couldn't be mailed. I found out later that you could pay a bit more to have the envelopes cancelled by hand, but by then, I'd already popped the snail mail into different (plain) envelopes in order to get them sent off.

Pretty Postal Tropical Swap 2018 - Sent | shirley shirley bo birley Blog

And all together . . .

Pretty Postal Tropical Swap 2018 - Sent | shirley shirley bo birley Blog

Blog Design by Get Polished | © 2018 shirley shirley bo birley blog